Mail Piece Creation
e-Certify / Help Center / Mail Piece Creation
Overview
There are multiple ways to create mail pieces in e-Certify. To create a single mail piece, click Create Tracking in the left navigation bar. To create a batch of mail pieces by uploading a file, navigate to the Mail Queue, then click Upload File. After mail pieces are created and saved, they are placed in your Mail Queue. You can also use our APIs to automate requests for piece creation and integrate these services into your own applications. Please contact support for more information on ConnectSuite Automate.
Explore Features
Create a single mail piece
Select A Profile: Select a mailing profile to use for the mail piece. Learn more about Mailing Profiles.
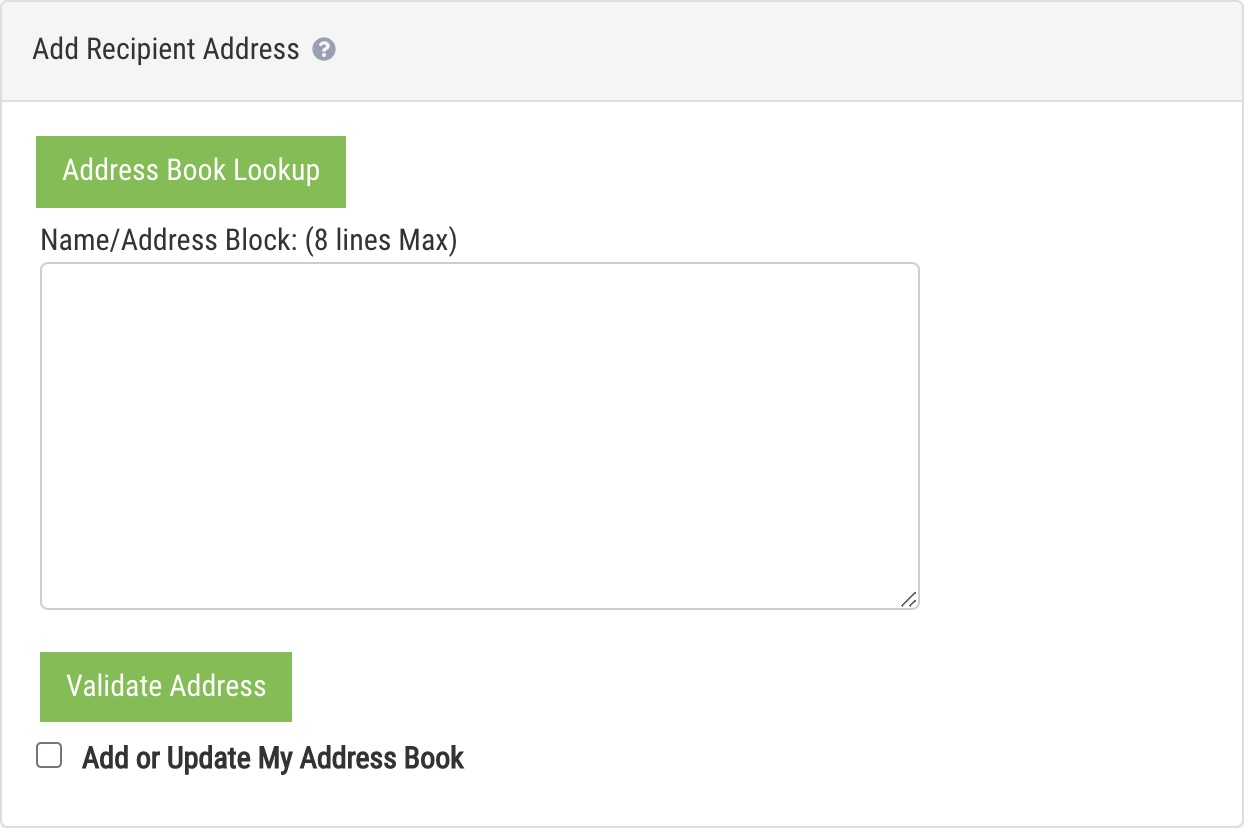
Add Recipient Address: Click Address Book Lookup to select an address from your address book, or manually enter an address into the Name/Address Block. To change the format for entering a recipient address, go to your Company settings.
- Validate Address: Ensure USPS compliant formatting based on USPS standards.
- Add or Update My Address Book: Save the address to your address book. It will be saved as a private address by default, meaning other users in your company won’t be able to see it.
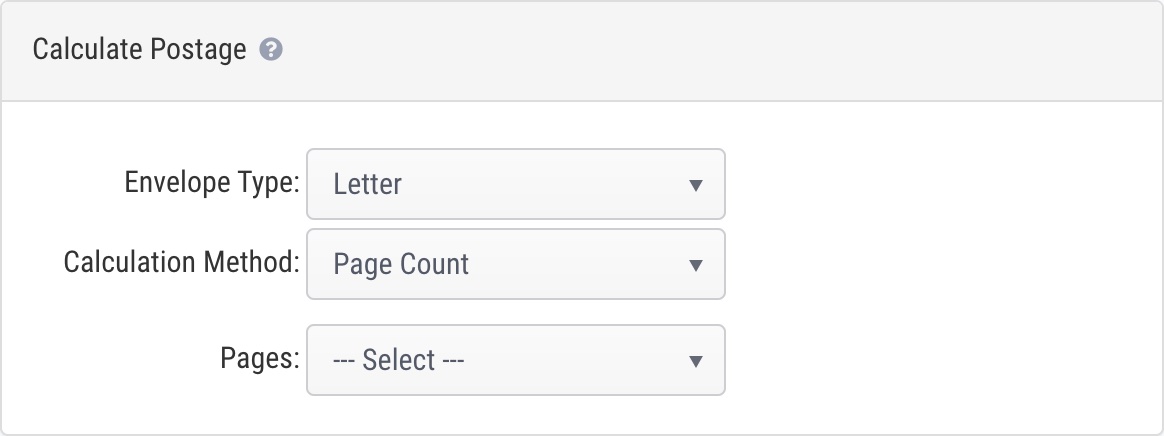
Calculate Postage: Estimate the postage required for your piece. Note that this is only an estimate and doesn’t need to be exact.
- Envelope Type: This field will be auto-populated according to your mailing profile selection, but can be edited.
- Letter: Max pages = 9-11, max weight = 3.5 ounces
- Flat: Max pages = 48-51, max weight = 13 ounces
- When the weight of your envelope or parcel exceeds the 13 ounce limit for First-Class mail, you can send your item with Priority Mail. Learn more about using Priority Mail.
- Calculation Method: Select a method for calculating postage.
- Pages/Weight/Postage: Enter the appropriate page count, weight, or postage based on your Calculation Method choice. You can set a default page count for all mail pieces you create by adjusting your settings on the My Profile page.
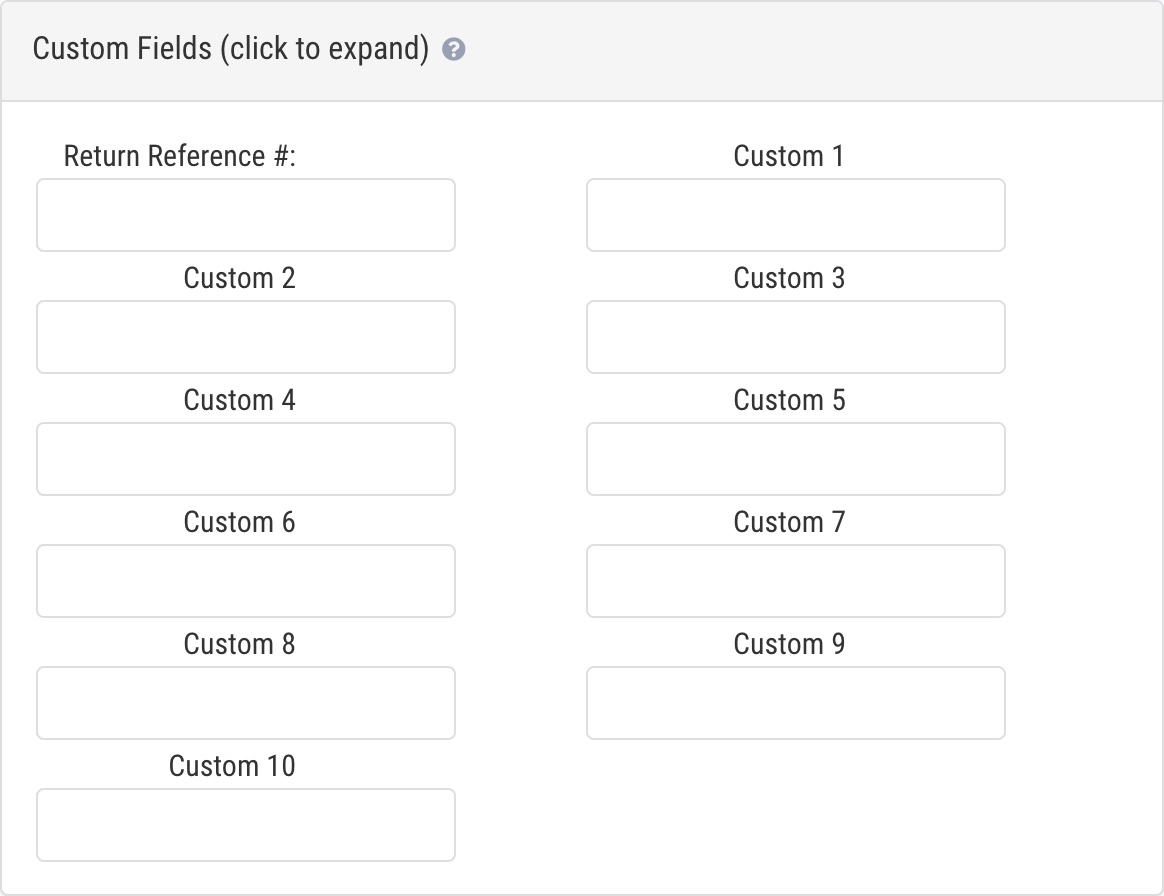
Custom Fields: These are variable fields associated with the mail piece that help with mail piece search and identification. Depending on your settings for custom fields in various places, these fields may be auto-populated.
- Note: Custom fields can have a maximum of 150 characters, and font size may reduce this limit.
- Required custom fields: When enabled, a red asterisk will appear next to a required custom field. Mail pieces cannot be created and saved without entering data in these fields.
- Learn more about Custom Fields.
Additional Settings: All of these fields will be auto-populated according to your mailing profile selection. Depending on the configuration of the selected mailing profile, some fields may or may not be editable.
- Tracking Label: Select the tracking label to be used for the mail piece.
- Locations: Selecting a location will do two things:
- It will allow only users assigned to that location to access the mail piece. Note that this only applies for users with the Filter By Location/Department display filter enabled.
- It will change the sender/return address for the piece. See sender/return address information below.
- Departments: Selecting a department will allow only users assigned to that department to access the mail piece. Note that this only applies for users with the Filter By Location/Department display filter enabled.
- Email Notifications: Configure email notifications for the piece. Depending on the configuration of the selected mailing profile, these fields may or may not be editable.
- To send email notifications to an alternate email address, select (Add One-time Email Address), and enter an email. To send email notifications to multiple email addresses, separate them with a semicolon.
- Proof of Acceptance Email: Receive an email with the POA attached when the USPS accepts the mail piece.
- POA emails are generally received within 24 hours of the acceptance event.
- Proof of Delivery Email: Receive an email with the POD attached after the mail piece is delivered and signed for.
- The USPS transmits proof of delivery (POD) files to ConnectSuite in several batches each Monday between 00:00-23:59. Note that ConnectSuite processes the PODs as the USPS makes them available, and it may take up to 24 hours to complete POD processing, make it available in e-Certify, and, if applicable, email it to you. In the event a POD is not available in e-Certify by the start of business Tuesday morning the week following the first Monday the POD was expected, please contact support for further investigation.
- Extra Services: Select the extra services you would like with the mail piece. Depending on the configuration of the selected mailing profile, these fields may or may not be editable.
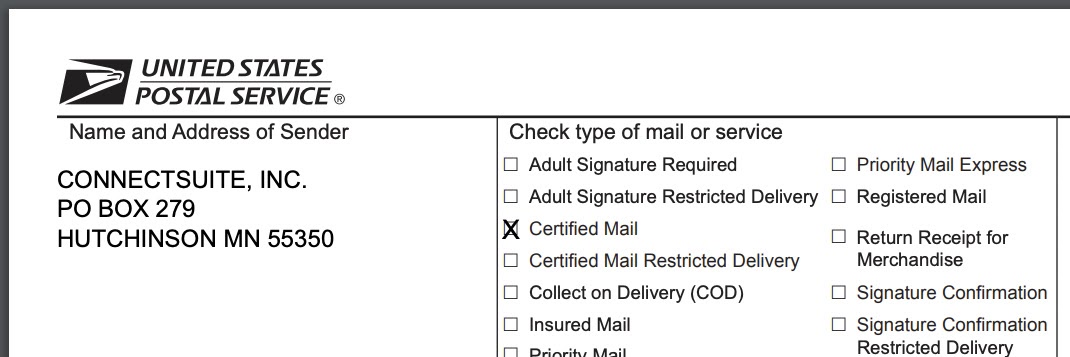
- Certified Mail: Certified Mail provides the sender with a mailing receipt (when PS Form 3877 or PS Form 5630 is used at the time of mailing), tracking history, and, upon request, electronic verification that a mail piece was delivered or that a delivery attempt was made. The USPS also maintains a record of delivery (which includes the recipient’s signature). If the mailer would like a copy of the recipient’s signature, Certified Mail can be paired with the Electronic Return Receipt extra service.
- Restricted Delivery: Restricted Delivery allows the mailer to direct delivery of a piece only to the addressee or an authorized agent. It must be used in combination with Certified Mail. The Electronic Return Receipt extra service can also be used in conjunction with these extra services if the sender would like to receive a copy of the recipient’s signature.
- Electronic Return Receipt: The electronic return receipt, commonly referred to as a proof of delivery (POD), provides the mailer with evidence of delivery that includes a digital copy of the recipient’s signature.
- Certificate of Mailing: A Certificate of Mailing is a receipt that provides evidence that a mail piece has been presented to the USPS for mailing. It is an official record that includes the date the mail piece was accepted by the USPS. Certificate of Mailing cannot be combined with any other extra service offered in e-Certify.
Save and Create Similar: When you want to create another piece with all of the exact same selections and settings but a new recipient address, click Save and Create Similar. You will notice all fields maintain your prior selections except for the Add Recipient Address section.


Sender/return address information
Your sender/return address is used in the following places:
- The sender/return address on the banner page
- The Name and Address of Sender field on PS Form 3877
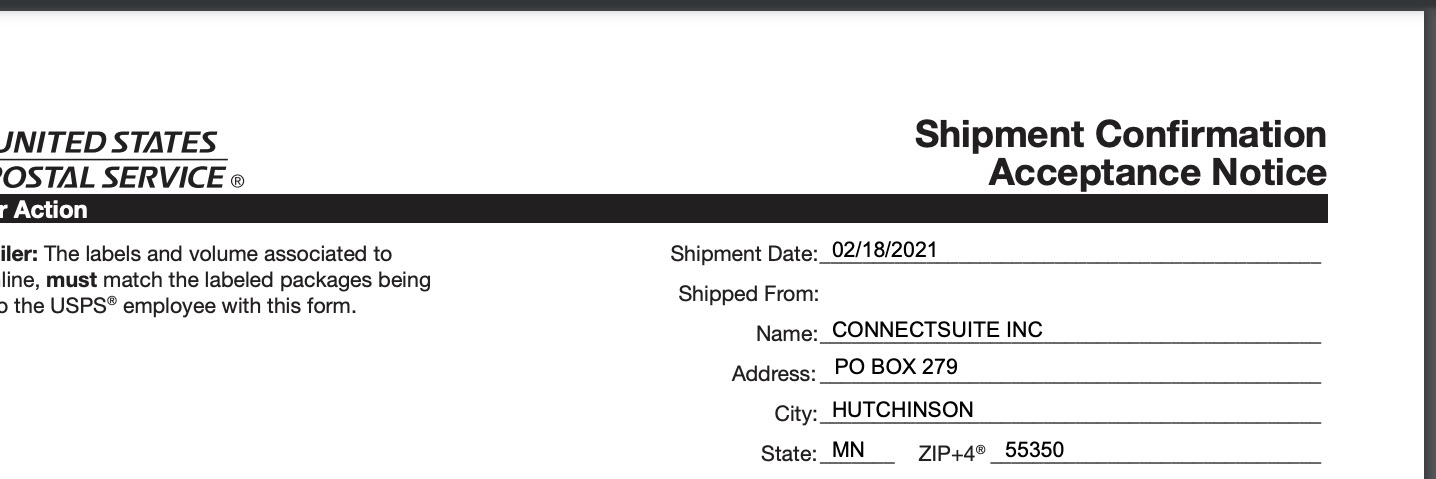
- The Shipped From fields on PS Form 5630
The address used in these places is pulled from the following, in this order:
- Return address selected within mailing profile
- User address
- Location address
- Location selected during mail piece creation
- Location selected within mailing profile
- Company address

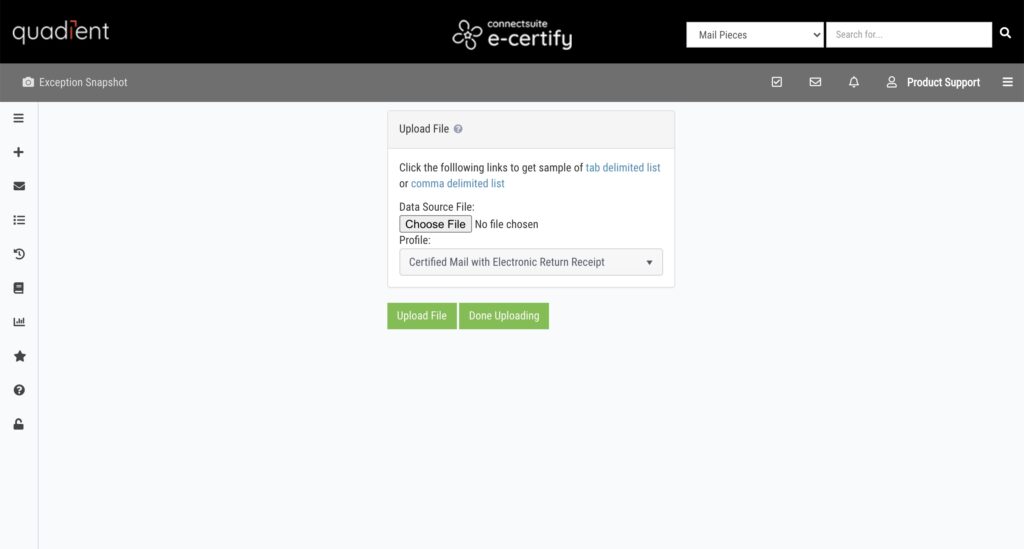
Create a batch of mail pieces
To create a batch of mail pieces by uploading a file, navigate to the Mail Queue, then click Upload File.
Choose File: The file to be uploaded must be saved as a CSV or TSV file. You can download the appropriate sample file according to your format for entering a recipient address below. Note that the default format is Address block, and this setting can be adjusted in your Company settings.
- Address block: A sample file for this format can be downloaded here. The name of the sample file is cm_ab_sample.
- Deliver as addressed: A sample file for this format can be downloaded here. The name of the sample file is cm_dad_sample.
Preparing your file:
- Use as many of the address columns as needed.
- Choose either the weight column or the postage column to enter a value for estimating postage. If the weight column is used, enter the weight of the piece in ounces. If the postage column is used, enter the amount of postage required for the piece excluding extra services.
- The custom field, retrefnum, and notificationemail columns are optional.
- Use the notificationemail column if you would like to specify an email address to be used for email notifications. To send email notifications to multiple email addresses, separate them with a semicolon. If this column is left blank, notifications will be sent to the notification email of the user who uploaded the file.
Profile: Select a mailing profile to be used for all mail pieces in the batch.